Step By Step Guide To Wire Balustrade

Step By Step Guide To Wire Balustrade
If you are landing on this web page, then I am guessing that you are interested in doing a wire balustrade, which probably means that you already know what a wire balustrade is, but just in case this is not the case, maybe the best place for me to start is to very briefly explain exactly what it is.
Put simply, wire balustrade is the use of wire (also known as rope or cable) to form a protective barrier used on decks, landings or staircases in both indoor or outdoor applications. It can be used as an alternative to glass or full timber balustrade.
The photo shown above is a typical example of what wire balustrade looks like.
So why would you choose it over glass or timber ? The primary reason should be personal preference (ie. you like it more), but when compared to the other two options it is also considerably cheaper and easier to install.
I am making the assumption that if you are continuing to read this article then you have decided that wire balustrade is what you are looking to do, and based on this being the case, the rest of this article will cover all of the major aspects of it.
I am also assuming that you are based in Australia, as the guidelines shown below are based on the Building Code of Australia. If you are not from Australia, then parts of this article may not be relevant to where you are located in relation to your countries building code.
So, where do we start ?
The first question you need to ask yourself is "what is the maximum drop from the surface you are standing on to the ground below ?". If the answer to your question is less than 1 metre, then a barrier is not legally required, which means that if you still want to construct a wire balustrade, then you are not subject to any regulations, in which case you have total freedom as to how far apart you want to space your posts and how many strands of wire you want to use.
If the maximum drop is greater than 4 metres, then you are not allowed to do horizontal wire balustrade, but are allowed to do vertical wire balustrade. If this is the case, then we suggest that you contact us directly to find out the best way to go about this, as it is a bit more involved.
If the drop is between 1 and 4 metres, then you can use horizontal wire balustrade, and you will need to make sure that it complies with the Building Code of Australia (BCA) guidelines along with the National Construction Code (NCC). Volume 1 relates to barriers for commercial and government installations and volume 2 relates to barriers for residential installations. These codes can be found online.
There is a fair bit of information within these codes, but the main 2 pieces of information that are critical is height of balustrade and the tension required on the individual wire strands.
The code states that a ball of 125mm in diameter can not be pushed through the wire balustrade gaps. If you work with the following guidelines, then you should be able to achieve a wire balustrade that will meet the requirements of the building code.
In trying to work this out, you should take into consideration the following:


The Hex (mechanical) Swager is used only on systems 11 and 12. It is best suited for 1 x 19 wire, but will also work with 7 x 7.

Put simply, wire balustrade is the use of wire (also known as rope or cable) to form a protective barrier used on decks, landings or staircases in both indoor or outdoor applications. It can be used as an alternative to glass or full timber balustrade.
The photo shown above is a typical example of what wire balustrade looks like.
So why would you choose it over glass or timber ? The primary reason should be personal preference (ie. you like it more), but when compared to the other two options it is also considerably cheaper and easier to install.
I am making the assumption that if you are continuing to read this article then you have decided that wire balustrade is what you are looking to do, and based on this being the case, the rest of this article will cover all of the major aspects of it.
I am also assuming that you are based in Australia, as the guidelines shown below are based on the Building Code of Australia. If you are not from Australia, then parts of this article may not be relevant to where you are located in relation to your countries building code.
So, where do we start ?
The first question you need to ask yourself is "what is the maximum drop from the surface you are standing on to the ground below ?". If the answer to your question is less than 1 metre, then a barrier is not legally required, which means that if you still want to construct a wire balustrade, then you are not subject to any regulations, in which case you have total freedom as to how far apart you want to space your posts and how many strands of wire you want to use.
If the maximum drop is greater than 4 metres, then you are not allowed to do horizontal wire balustrade, but are allowed to do vertical wire balustrade. If this is the case, then we suggest that you contact us directly to find out the best way to go about this, as it is a bit more involved.
If the drop is between 1 and 4 metres, then you can use horizontal wire balustrade, and you will need to make sure that it complies with the Building Code of Australia (BCA) guidelines along with the National Construction Code (NCC). Volume 1 relates to barriers for commercial and government installations and volume 2 relates to barriers for residential installations. These codes can be found online.
There is a fair bit of information within these codes, but the main 2 pieces of information that are critical is height of balustrade and the tension required on the individual wire strands.
The code states that a ball of 125mm in diameter can not be pushed through the wire balustrade gaps. If you work with the following guidelines, then you should be able to achieve a wire balustrade that will meet the requirements of the building code.
- Your handrail height can’t be less than 1 metre (100cm or 1000mm) on a flat (horizontal) application or less than 0.865 metres (86.5cm or 865mm) on a stair (incline) application, which is measured from the edge (nosing) of the step (tread) to the top of the handrail in a dead vertical direction.
- A spacing between wires of 80mm is the largest this is recommended, but it can be less if desired, although having a smaller spacing will result in more wires, which means more (unnecessary cost) and visually not as nicer looking. To work out how many wires you need, measure the gap (from the underside of the handrail to the floor/deck) and divide it by 80 then minus 1 from the result. Example: If the gap is 960mm, then when divided by 80 the result is 12. Minus 1 from this number and the answer is 11, which will be the number wires you will need for each section of wire balustrade.
- Using 3.2mm wire in either a 1x19 or 7x7 configuration (more on this later) you will need to have a support post approximately every 1.5 metres (150cm or 1500mm). It is ok for the wire to run through these posts if it is in a straight line, as long as the wire is fixed to the post on each end of the straight run. Having these posts spaced at these intervals (or less) will make sure that the wire should not be able to be pulled apart in such a way that a 125mm diameter ball could be pushed through it. As we will discuss later, there are different wire balustrade systems that are available. Which system you choose will be based on a number of different factors, but of relevance now is that some of the systems have a maximum straight run of 6 metres and some are 10 metres. If your straight run is reasonably longer than what the system you wish to use can handle, then you will need to stop and re-start it at one of the posts along the run.
- If the wire balustrade needs to change direction (eg: to go around a corner), then we suggest that you terminate the wire at this post and restart it in the new direction. The reason for this is that changing direction decreases your ability to tension the wire to the correct amount required to meet the building code.
- make sure your handrail is not less than 1 metre on a horizontal surface or 0.865 metres on a stair incline.
- Keep spacings between wires at 80mm (or less).
- Use 3.2mm wire and have a post every 1.5 metres or less.
- Keep your wire runs straight. Only terminate when changing direction or when exceeding the maximum length of the particular wire balustrade system you are using.
In trying to work this out, you should take into consideration the following:
- Are you fixing into timber or metal posts, or a combination of both.
- Is the wire for flat areas (such as decks) or incline areas (such as stairs).
- The distances between end/corner posts.
- Ease of installation, and whether you’d like to do it yourself or work with a trade professional.
- Aesthetic appeal. You may want to choose a wire balustrade setup that matches your personal tastes and architectural surrounds.
- Finally, budget. Some systems are considerably cheaper than others, but may not look as nice or be as easy to install.
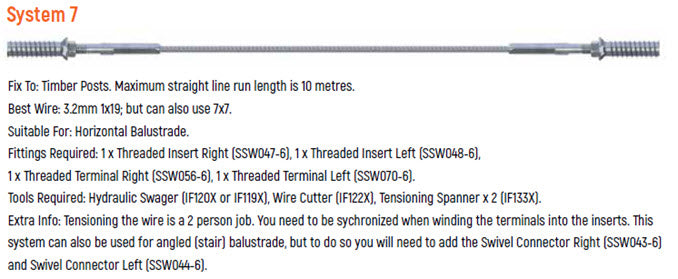
There are 12 different wire balustrade systems that we show below. In each of these systems we cover the considerations shown above. It should be pointed out that this is NOT a finite list, as it is possible to mix one system with another, but before mixing systems we would suggest that you contact us first just to make sure that what you are panning on doing is actually going to work. If you like what you see, you can click on the image and it will take you straight to the relevant section of our online shop.


Before finishing this article I need to take some time to discuss the types of wire that are available and what swaging is and the different tools that work with the different systems.
In regards to the wire, we are specifically talking about the 3.2mm diameter version, as this is what is most commonly used for wire balustrade (particularly in domestic situations). There are bigger and smaller wire diameters available and many of the different sizes also have fittings that suit them; but once you move away from the standard 3.2mm version, then the tensioning and spacing requirements also change.
The 3.2mm version comes in 2 different configurations;
- 1 x 19, constructed from 19 individual strands twisted in a helical fashion. It is the heaviest, least flexible wire with the highest break load of over 850kgs. It also has the least stretch over the same tension compared with the other constructions. It is the nicest looking of the 3 wires and can be used on all systems except 3 and 4. Click here to see it in our online shop.
- 7 x 7, constructed of 7 sets of 7 wires. It is flexible and can loop around thimbles, allowing it to be easily crimped with metal copper swage fittings. It has a breaking load of over 675kgs. It can be used on all the systems, but is best suited to system 3 and 4. Click here to see it in our online shop.
It is now time to move onto discussing swaging (pronounced ‘sway-jing”).
Swaging (also known as crimping), is the process of securing fittings to the end of wire cable, so that they become a single assembly. This allows you to attach the wire cable assembly to a post or other fixing point. The process of swaging is easily done, with no prior experience being needed.
There are 3 different style tools that we have on offer; a Hydraulic Swager, a Hand (mechanical) Swager and a Hex (mechanical) Swager.
The Hydraulic Swager come in either a PRO or MINI version and is used only on systems, 1, 2, 5, 6, 7, 8, 9 and 10. It is best suited for 1 x 19 wire, but will also work with 7 x 7.
The Hand (mechanical) Swager is used only on systems 3 and 4, and will only work with 7 x 7 (or 7 x 19) wire. This swager also has the added bonus of having a wire cutter built into the tool.
The Hex (mechanical) Swager is used only on systems 11 and 12. It is best suited for 1 x 19 wire, but will also work with 7 x 7.
There are some businesses out there that will swage the fittings to the wire for you, but the downside of going down this path is that if you make a mistake in your measurement (that you give to them) or if one of your cables breaks (due to a person standing on it), then you won’t have a tool available to fix the problem.
We have sourced the tools for a very competitive price so that it becomes only a small addition to the overall cost of the project.
We recommend that when you place an order for your wire, fittings and tools that you order a small amount of wire and fitting extra so that you have a few spare if you need to repair a damaged run of wire cable.
We have pretty much covered everything that you need to know, so hopefully the thought process of constructing some wire balustrade is not as daunting as you were thinking it was going to be prior to reading this article. Please note that all advice given in this article is to be used as a guide only; you should always double check building codes with your local council or a registered builder.
If this is the case, then click here to start the process of ordering the parts you want, but if you are still unsure about some aspects please feel free to contact us and we can hopefully answer any extra questions that you may have.